


Premium File
119 Q&A
$76.99$69.99
100% Real Salesforce Certified Sharing and Visibility Designer Exam Questions & Answers, Accurate & Verified By IT Experts
Instant Download, Free Fast Updates, 99.6% Pass Rate

Certified Sharing and Visibility Designer Premium File: 119 Questions & Answers
Last Update: Mar 23, 2024
Certified Sharing and Visibility Designer Training Course: 21 Video Lectures
$74.99
Salesforce Certified Sharing and Visibility Designer Exam Screenshots
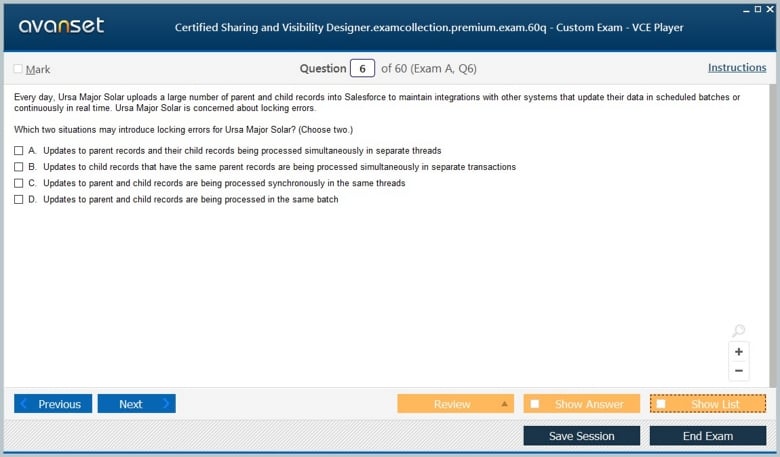
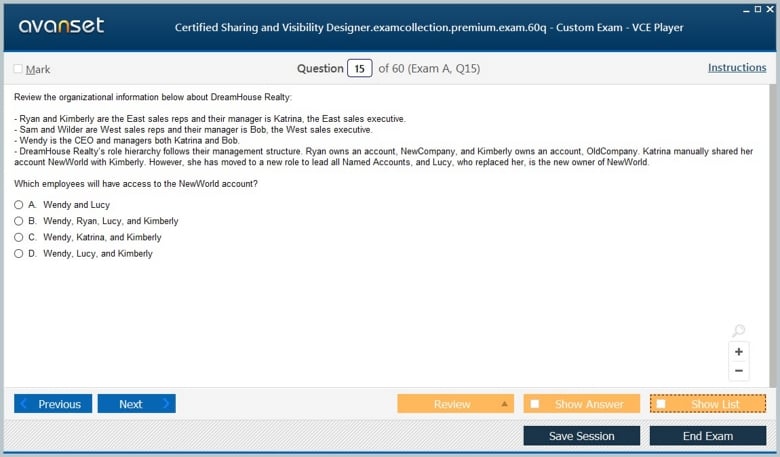
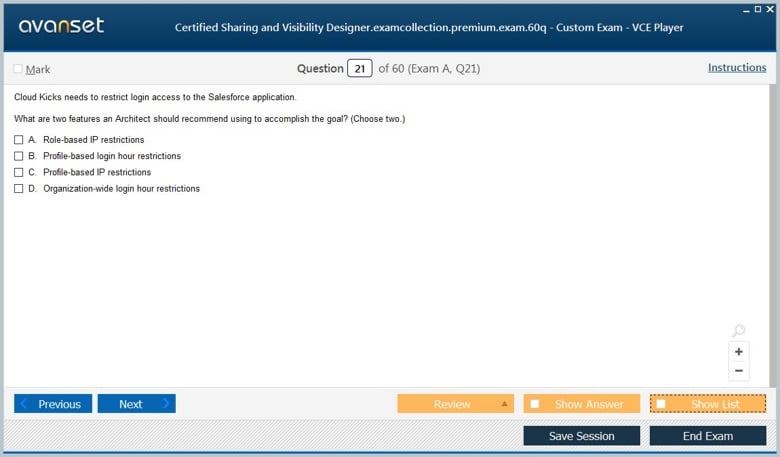
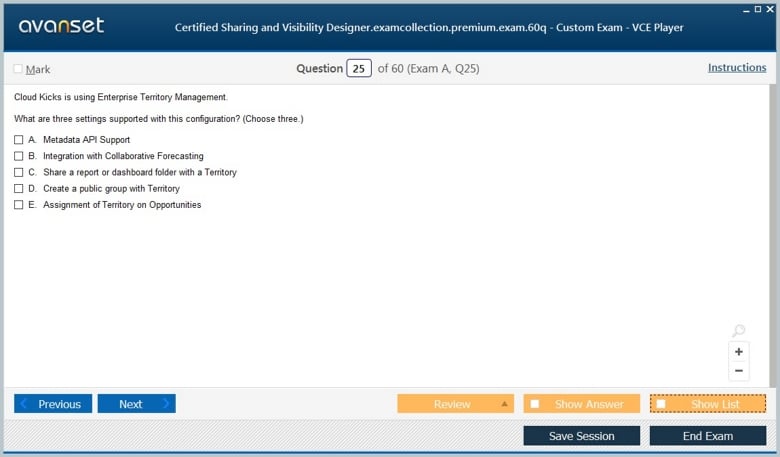
Salesforce Certified Sharing and Visibility Designer Practice Test Questions in VCE Format
| File | Votes | Size | Date |
|---|---|---|---|
File Salesforce.prep4sure.Certified Sharing and Visibility Designer.v2024-01-17.by.lexi.51q.vce |
Votes 1 |
Size 138.22 KB |
Date Jan 17, 2024 |
File Salesforce.certkey.Certified Sharing and Visibility Designer.v2020-03-26.by.caleb.25q.vce |
Votes 2 |
Size 97.5 KB |
Date Mar 26, 2020 |
Salesforce Certified Sharing and Visibility Designer Practice Test Questions, Exam Dumps
Salesforce Certified Sharing and Visibility Designer Certified Sharing and Visibility Designer exam dumps vce, practice test questions, study guide & video training course to study and pass quickly and easily. Salesforce Certified Sharing and Visibility Designer Certified Sharing and Visibility Designer exam dumps & practice test questions and answers. You need avanset vce exam simulator in order to study the Salesforce Certified Sharing and Visibility Designer certification exam dumps & Salesforce Certified Sharing and Visibility Designer practice test questions in vce format.
This is Section One: Declarative Sharing, and this lecture is about List of Views, Report, and Dashboard folders and access. The topics covered in this lecture are custom list views, list view visibility, report and dashboard folder, and report and dashboard access level. List views are a way to display a filtered list of records with a subset of selected fields for each object and on its tab. List views are created by defining two things: what fields you want to see as columns and what filtered records you want to see. So, as you can see in this example, this is an example object that has, let's say, five fields (field one to field five), and let's say three records (record one to record three). List of Views allow you to specify which key fields you want to be displayed as columns first, and then optionally add a filter to specify which records are returned. So as an example, suppose we want a list of views on this specific object. And this list view should only display fields 1, 3, and 5 as columns on the main page and records 1 and 2. This can be achieved by creating a list view that has only the three fields (field one, field three, and field four) and that uses a filter that only returns records one and two. Let's give another example, this time from Salesforce. Suppose we want a list of views on the account object that displays five columns. These are account name, account site billing, state phone, and account owner aliases. And on top of that, we want to only display the accounts that have SLA equal to gold or platinum. For that, an Ellis view is created with first the five selected fields to display and then the filter on the SLA field. These are the permissions related to lists of views. In order to create a List of Views, modify, and delete their own List of Views, the user should have the Create and Customize List of Views permission. And to create, edit, and delete public lists of views, the user should have the Manage Public List of Views permission. Upon creation, a custom list of views can be made only available to the user who created it. This is a private list view, visible to all users. In this case, it is a public list of views shared with a specific set of users. As you can see on the right side, these are the three options that you get when creating a list of views. When sharing a list of views, it can be shared with roles, public groups, roles and internal, subordinates' roles, internal and portal, subordinates' territory if it is enabled, and territory and subordinates, also if enabled. Now, let's talk about the difference between listed views and record access. As you are aware, a list of views gives the user who clicks on it a specific view of records. and this view is based on record filters and fees displayed. The records that are returned by a list of views can only be a subset of the records that the user has access to. And what you need to know is that a list of views will never give you extra record access. In other words, "List of View" is not a sharing mechanism to open up record access. It's just a way to display the records that a user already has access to. These are two use cases for the list of views. The first one a user needs to access is his or her own opportunity that will close in Q Two.For that, this user will create a list of views with a filter to specify my opportunities and the close date as being within Q Two.The set of fields that should be displayed and this list view should remain private. There is no need to share this list view. The second use case, any urgent escalated case, should be easily accessible to all Level 2 agents. In this case, the admin will create a public group that has all of the L-2 agents and a filter to specify all open cases with the field Urgent Escalated checked. This is on the list of fields that should be displayed, and this list of fields should be shared with the public group that has all of the L-2 agents. Now let's jump into Salesforce and let me show you the list of views and List View access and action. Okay, so now I am logged into Salesforce. On the Chrome browser, I have the Admin login, and on the Firefox browser, I have another user login. So let's go to Chrome, and then the first thing that we need to do is create a public group, and then we can create a list view, and then we can share it with that group to do.So let's go to Setup and create a public group. Okay, click on you, and let's say this group will contain the entire Sales and Se team. So it will have the lead, the manager, and the users of type "Sales" and "Se." So let's group all Sales and Se users together. If you want, I can show you the roles. So as you can see, we have different managers. So this will have all of the sales team members and the sales manager's role and subordinates. It will also have the manager's role and subordinates. So in this case, I need to add these two roles and subordinates to this group. So I will choose the sales manager and the SE manager. So in this case, all of the users within that role and within the roles underneath these two roles will be added to that group. Okay. Click on "Save." Now I have a public group that has all the sales and the SE users. Okay, now let's go to the other users. So in this case, I'm logged in as Amy. Amy is part of the SE team. So let's go to the case object and see that Amy has access to these two cases. Let's now create a new list of views for Amy. So in this case, I need to click on this, and then I can create either a new list view or I can clone an existing one. Let's go and create a new list view. So let's call this one. all my new cases. This list view will have all of the cases that are assigned to Amy and that are of status equal to new. As you can see, Amy can only create list views that she can access. She cannot share this list view. Why? Because if you go to the Chrome browser and then open the profile of Amy, which is in this case the custom standard user, you can see that she can create a customised list of views, but she doesn't have access to the second permission, which is manage views. So for her to be able to create and share lists of views, this permission should be accessible in her profile or through a permission set. Let's keep it like that, and let's go back to Amy. Next. Click on "Save." So on the right side, you can see that now we can specify the filters. So my cases, which means all of the cases that are owned by Amy, Now let's create a new filter. In this case, it will be based on the status field equal to "new." Okay, so now we have two filters: ownership cases and status equal to new. Save. This is the first part of the ListView config. The second part is to specify the columns, or the fields. In this case, we have to go to the select fields for display. Now we have all of these. We can, of course, add and remove. Let's keep them like that. And let's click on "Save." Okay, so as you can see, Amy cannot see any case in this list view. But you can see all of these cases and the old cases in the list view. Why? Because as you can see, Amy owns one case, and this case is on hold. Now, what happens if I change this to something new and click on Save? This case will now show on the other list view that we have just created, which is this one. Now let's go back to Chrome, and let's create a list of views that will be shared. So to do so, we have to go to the object where we want to create this list of views. So let's go to the case object and let's create a new list view. Let's call this one a case with status equal to new. And as you can see, now we have all of the options. Why? Because I am now logged in as the admin, and the admin has both listed use permissions. So in this case, I can either keep this to myself as an admin, or I can say that all of the users can access this one, or I can choose the third option, which is to share this list of you with a specific number of users. So in this case, let's share this with the public group and with the group that we have just created, which is all Sales and Service users, and click on Save. Okay, we can also edit the sharing. So by clicking again on this one and then clicking on the sharing settings, we can specify that this should now be a private list view, or all users can see it, or we can change the share. Now let's go to the roles. And as you can see, we have shared this list view with the Sales team and the SE team, which means that Amy will have access to this list view because we have shared this list view with the Sales team and the SE team, and Amy is part of this role that was part of the group. If we go back now to Amy's.Org or to Amy's login, and then if we refresh this page, you can see that now Amy will have access to this list view, and if I click on it, Amy will only see one case. But if I go back to my admin login and if I click on this list view, you can see that I have access to all of the cases that are new. We have escalated. So let's see about this one. Oh, I did not specify the new case. So in this case, let's go to status, then equal to "newly done" and save. Now we'll see that I only see the new ones. And if I go to Amy's page and I refresh this, you can see that Amy will see the same case, because now this is the only case that she has access to. So in other words, list views will not open up any record access. They will only allow us to view the cases or records that we have access to, but in a different way. We can specify the filters, and we can specify the columns. The second part of this lecture is about report and dashboard folders. In Salesforce. Report and Dashboard folders are used to share reports with other users. Reports and dashboards cannot be shared one by one. You cannot pick single reports or dashboards and share them. The only way they can be shared is through folders. When sharing a report or a Dashboard Folder, it can only be shared with users, public groups, roles, and territories. If enabled, a Report or Dashboard folder can have subfolders. In it, a subfolder inherits the sharing settings of the parent folder. So, for example, you can have a report folder called "Sales Team Report," and inside it you can have multiple folders that are used to arrange the reports. All these subfolders will inherit the sharing of the parent folder. So if the main parent folder is shared with the user, then all of the subfolders are also automatically shared with that user. This means that all the reports inside the subfolder are also shared as if they existed directly under the main folder. These are the permissions that are needed to share Report or Dashboard folders. In order to share report folders, the user should have the Managed Reports and Public Folders permission. And to share Dashboard folders, the user should have the Managed, Dashboards, and Public Folders permission. You can share a report or a Dashboardfolder with up to 25 users, groups, roles, or territories if sharing is enabled from the UI. To share a folder with up to 500 users, groups, roles, or territories if enabled, we have to use the Rest API. Note that when I tried to create a report folder, I clicked on the Reports tab and I expected to see the New Folder button, but it was not there. If you don't see this button on the Report page, go to Salesforce Classic and search for folder sharing within Setup, then check the enable access levels for sharing Report and Dashboard Folders box. After enabling folder sharing in Classic, you will see the New Folder button on the Report page. Upon creating a Report or Dashboard folder, it can be either private, which means that it's not shared, or it can also be shared with a specific group of users. This group or set of users can be users, public groups, roles, or internal subordinates. roles as internal and partner subordinates. It can also be a territory if enabled, and a territory and a subordinate if also enabled. And the access level can be "view," "edit," or "manage." As you can see on the right side, these are the three options for sharing a report folder. Now, let's talk about the difference between Report and Dashboard folders. shared and recorded access As you may be aware, the report and dashboard folders shared with users grant this user access to the reports and dashboards contained within those folders. Accessing these reports and dashboards does not give extra record access. In other words, a report and Dashboardchair do not open up record access. The only way that a user can have extra access through a dashboard shared with him or her is if this dashboard is configured to be viewed by another user who has extra access on top of the access of this user. So for example, a dashboard can be configured to be viewed by the CEO, which belongs to the highest role in the hierarchy. In this case, running this Dashboard by auer with very limited record access will show the Dashboard component displaying the full record count. But when that user clicks on the component to try to go to the report behind it, then only the records that he or she has access to will be displayed in that report. So in other words, the dashboard will display the full records based on who is running it, which is the user that is running this dashboard. But once we click on the component to go to the report, we will only see the records that we have access to. Now let's jump to Salesforce to see the report and dashboard folder. Share an action. I'm now logged into Salesforce using my admin user. Let's go to the Reports tab. And what I did was create a new folder, which is called "custom case reports." And inside this folder, I created a report, which is called the "all cases by status report." And I did the same thing for a dashboard. So I went to the dashboard stab and I created this folder. And inside it I have one dashboard, which is called the case dashboard. Going back to the reports and to this folder, you can see that this folder was not shared with anyone at that moment. Now, if I go back to another user's page, in this case, Amy's page, you can see that Amy can also create reports and dashboards. But Amy does not have access to this folder yet. Going back to the admin page, let's give Amy access to this folder. So if I go to the share option, you can see that now I can share this folder. So let's go and share this one with the group that we have created, and that one is called all sales and SE users. So to share, we have to select the group, and then we have to specify the access, and then we have to click on share. Once we do that, you can see that the group has been added to the list of users that can access this folder. Done. And let's do the same for the dashboard folder view and share. Done. Now, if I go back to Amy's login, and if I just refresh this page, you can see that now Amy will have access to this folder, which means that she will have access to all of the reports within that folder. She can only see two because these are the only two that she has access to. Now let's go to the dashboard, and let's see the folder that we shared with Amy. So now, what will happen if I run this? Let's just go back to the dashboard on the admin page, and you can see that this dashboard is configured to be seen by me. So, say you want this to be seen by myuser, which is the same as me, but you just need to give it a name, save and save, and you're done. So twelve total case record. Now, if I go back to Amy's page, and ifI run this dashboard, how many records we will seewe will see twelve records on the Dashboard. Even though Amy does not have access to these cases, she can see them within the Dashboard. But what would happen if Amy clicked on the report that is behind this component? Amy will only have access to two cases, and that's it for this lecture. In this lecture, we talked about list, viewaccess, and Zport and Dashboard folder access. We mentioned that aesthetic view is a way to display records based on record filters and fields. It can be made private, public, or shared with groups, roles, or territories. One very important thing to note is that ListView does not give us any extra record access. We also talked about reports and dashboards and how to share them. The only way to share reports and dashboards is through folders. A report or a Dashboard folder can be made private or shared with specific groups of users. These can be specific user groups, roles, and territories. Upon sharing, the access level can be viewed, edited, or managed. Finally, like the list of views, sharing, and reposting, Dashboard does not give extra record access. Well, except for when a dashboard is initially configured to be viewed by a user who has extra access and then the user accesses it. In this case, the Dashboard would display these records, but when clicking on the report behind the Dashboard component, the report will not show these records. And finally, as usual, thanks for watching.
This is Section 1 on declarative sharing, and this lecture is about roles and the road hierarchy for data access. The topics of this lecture are road hierarchy, grant access using hierarchy, and record access. As we have seen, roles and road hierarchy are a way to open up record access. It's usually the first mechanism that we use to open up record access before other mechanisms like sharing rules, manual sharing, or teams. The road hierarchy is a tree-like structure that is similar to an old chart, but it is used to show how rules are related to each other and is used to open up record access. A role hierarchy may or may not match your.org chart. It's not necessary that these two be the same. Sometimes they will be the same, and at other times they will be different. You need to think of a role hierarchy as the old chart of record access in Salesforce. It will show you how users within SalesForce are related to each other when it comes to record access. Withdrawal hierarchy users can access the data of all the users directly below them in the hierarchy. These are called subordinates. In other words, users hire a hierarchy, which inherits the same data access as its subordinates. So managers and managers of managers as specified in the role hierarchy will gain as much access as their subordinates, which means that if the subordinate has read-only access, so will the managers. This access applies to records owned by users as well as records shared with them. Finally, with onlyroad hierarchy and the OWD set to private, two users of the same role will not see each other's records. But if another sharing mechanism is added to open up record access between these two users, like, say, sharing rules so these two users can see each other's records, a role can have one, many, or even more users assigned to it. So, unlike a profile, a role is optional when it comes to the creation of a user. So what happens if we have a user without a role? Well, when a user does not have a role, thisuser will not benefit from road hierarchy and will notgive access to his or her records using road hierarchy. So this user will not gain access and will not give access using road hierarchy. At this release, An.org is allowed 500 roles, but this number can be increased by SalesForce. As a best practice, keep the road hierarchy to no more than ten levels of branches in the hierarchy.Modeling the road hierarchy begins with understanding how the ORG is structured. This is usually built starting from the top. The CEO oversees the entire company and needs access to all of the records. The CEO usually has direct reports that can be segmented by business units. Let's say the sales team and then the support team or geographical units. Let's say the Emir region, the Apex region, and so on. That person then has direct reports thatcould be further segmented and so on. So we have the CEO on top, a team underneath, and different roles for different teams. Let's say we have a sales team, and we start with, say, the sales manager role. Underneath the Sales Manager role, we have the Sales Team. So we can structure the role hierarchy by using this model. Although this sounds very much like an HR orchard, keep in mind when modelling road hierarchy and salesforce that we have to focus on data accessibility with a consideration to HR reporting. Now, let's talk about granting access using hierarchies. When the Grant Access Using Hierarchies option is enabled, which is a checkbox, then users have access to the data owned by or shared with their subordinates and the hierarchy for that object. By default, the grant access using hierarchy's option is enabled for all objects, and it can only be changed for custom objects. In other words, the "Grant access using hierarchy's option" is always selected and is not editable for standard objects, but we can deselect it for custom objects. Now, what happens when a user gains access to a record through the road hierarchy? Any user that gains access to other records using the road hierarchy via grant access using hierarchies will gain as much access as the subordinate. As an example, and as you can see on the right side, we have this road hierarchy. So if a western sales rep user has read access to a record of an object, let's say the account object or any other object, then all users and the direct sales and CEO roles will have read access to this record. Of course, these users can have other access. They can have the right access through other means, like sharing rules. We are only talking about access via road hierarchy and structure. Now, what happens behind the scenes to grant record access using the role hierarchy? As we know, we have two system-defined types for granting record access. First of all, we have the object sharing tables, and then we have the group maintenance tables. Now, what happens to the role hierarchy? As you can see in the third row, when a user group, queue, role, or territory gains access to a record through the road hierarchy or is a member of a group that inherits access through a group hierarchy, the access is granted behind the scenes through the group maintenance table. So, in other words, the group maintenance tables are the tables that will be used behind the scenes to grant access for the role hierarchy. Okay, so now what is written to the group maintenance table? Stateforce, on the other hand, uses system-defined groups to implement hierarchies for each role and behind the scenes. These groups are the role group, the role and subordinates group, and the role and internal subordinates group. When we have community implemented, we use this class group. The role group consists of users with a specific role and one of its manager roles. It's used to give managers access to their subordinate's records. The role and subordinates group consists of users with a specific role, one of its manager roles, and one of its subordinate roles. It is used when an organisation defines a rule that shares a set of records with a particular role and a subordinate. And finally, role and internal subordinates is exactly the same as role and subordinates, but it excludes portal or community roles. This is an example for you to understand these system-defined groups that are used in group maintenance tables. Let's say that we have a small role hierarchy. On the right side, we have four different roles. We have the CEO role, the sales executive role, the east sales rep, and the west sales rep roles. The table on the right side specifies the role of each user. Mark belongs to the CEO role, Maria to the sales executive role, Bob to the east sales rep role, and Wendy to the west sales rep role. As a result of this role hierarchy, the following system-defined groups are created by SalesForce. First of all the CEO role that has onlyMark and then we have the sales exec role. This is again a system group that was created by Salesforce. So the sales exec role has Maria as well as Mark because Mark belongs to a role higher than the sales exec role. This is an indirect member. All users in red in this table are indirect members. And then we have the west sales rep role, which has Wendy as well as Mark and Maria because they belong to roles higher than this west sales rep role. Mark and Maria are indirect members. Then there's Bob's role as east sales representative. It also has Mark and Maria because they both have roles higher than this east sales rep role. Mark and Maria are also indirect members. On top of these groups, we have the role and subordinate group that has Mark and any user with a role under Mark's role. So this group also has Maria, Wendy, and Bob. We also have a sales executive role and a subordinate group that includes Maria and any user who has a role that falls under Maria's role. So this group also has Wendy and Bob. On top of that, this group has Mark as an indirect member because Mark inherits record access via hierarchy because he belongs to a role that is higher than the sales rep role. The same logic applies to the other two groups. to the role of west sales rep and subordinate group, and to the role of east sales rep and subordinate group This is a more complex example. As you can see, we now have six roles. So the number of the resulting system groups is much higher. We now have twelve system groups. This is excluding the type of group that includes internal subordinates because this is only applicable when we have a community. So if we have a community, we will even have more groups. We can use this localquery select ID, developer name type from group to query the groups. And as we will see now in the demo, we have different types of groups. One of them is the role group, and we also have the role and subordinates group. Let's now jump to Salesforce to see roles and the role hierarchy in action. Okay, so I'm now loading into Salesforce. I'm now on the admin login. Let's just go to the setup menu, and let's show you the role hierarchy three.As you can see, we have three. This is the role hierarchy, and you can see that we have different roles. and these are nested roles. So we have the president on top. Underneath it, we have four roles, which are the finance manager, sales manager, service manager, and then we have the sea manager. Now we can nest rolls underneath these. As you can see, the finance manager doesn't have any role underneath it. So, if we have a user who belongs to this role, this user will not be able to access any records because there are no roles beneath his role. And then we have different roles underneath other roles, like the Sales Manager role. We have an Easter Sales Lead, and then underneath this one we have another role. So if you are part of a role that sits at the bottom, like these eastern sales teams, western sales teams, service teams, or SE teams, any users that belong to these will not gain any record access by using road hierarchy. Now, let's look at how to add users to the roll hierarchy. We can do this from the users, so I can go to the users, or we can do it from this tree. I can click on Assign, and then I can specify the users that I want. I can remove existing users or add users. And then I can see that I have different filters that I can use so that I can check for users. We can now add roles beneath existing ones. So I can click on "Add Role." Once I click on Add role, which is underneath the sales manager role, this role will automatically be underneath this one. So it will report to the sales manager role. So if I click on this, you can see that this role reports to the role above it. Now if I go to the users section, I'll go to the list of my users. So this is the list of my users. As you can see, each one of them has a role except for this system user. So what I want to show you is that I can remove a role from a user. So if I click on edit next to Sarah, you can see that I can make this user have zero roles. So if I click on Save, you can see that. Now Sarah doesn't have any roles, which means that Sarah will not give access to any other role using road hierarchy, and she will not gain access using road hierarchy. So let's give the role back to Sarah. Now let's go to the sharing settings. This is the Sharing Settings page. As you can see, we have granted access using the Hierarchies column. And then we have this checkbox. If I click on Edit, you can see that for any standard object, I cannot edit this. I cannot say that. Let's say for a casedon't grant access using Hierarchies. This is not applicable to standard objects, but this is applicable to customer objects. So as you recall, we have these two custom objects. I can uncheck them. Okay? So what happens when I do that? Let's go to another user. So on firefox. I'm logged in as Jack Scott, and Jack is part of the sales manager role. So in this case, Jack should access all of the records that are accessed by all of the users enrolled under his role. Rose, David, Roy, Ron, and so on. Let's go back to the admin page and let's make sure that we have these two checked, and let's click on Save. And if I return to Jack's page and select, say, the Invoices tab, you can see that these are the invoices that Jack can access. Because I devised a sharing rule, he has access to all of these. So let's go back, and let's remove the sharing rule. So I will go to the Invoice object, and as you can see, we have this sharing rule. I will delete this one, and then I will wait a little bit for this sharing rule to be calculated. Okay, so now it seems that the calculation is done. Let me go back to the page, and let me refresh this list of you. You can see now that I have fewer records that can be accessed by Jack. He has access to all records belonging to users in his role. So you can see David and Ron. So David and Ron are users under Jack's leadership. Now, what happens if I go back to the admin page and remove this access? So let's go to the Invoice object and let's do that save before going back to Jack's page. And refreshingly, now Jack can only access his records. Going back to the Admin page and re-adding this, you will see that Jack can now access other users' records that are underneath him. Of course, this did not take a long time because I don't have many records. But if, let's say, you have an ORG with millions of records, this will take time. Now let's go to the admin page, and let's now search for the groups that are created for the role hierarchy. As you can see, I have this Chrome addon; it's called Organizer. It's used for login access. It's used to have a so-called query; it's used to check all of the fields of an object, and so on. So, let's go to the quickquery option and do that, let's write this query. So I want the ID, the dev name, and the type from the group object. As you can see, I have the groups, and then I have the type. So the type will specify what this group is used for. So as you can see, I have many different groups, and then I have the type. And I also have groups that are not part of the role hierarchy. So I have a regular group. These are the two groups we created for the sharing. I also have queues. So queues are groups in a salesforce. And then I have this group called "internal users," which is an old group. So these are the groups that are created when we build our role hierarchy. So now if I add any role, you can see that two groups will be added, one for the type role and the other for the type role and subordinates. And if I have a community, I have a third group, which is my role and internal subordinates. And that's it for this lecture. In this lecture we talked about the road hierarchy, which is a way to open up record access. It is similar to an org chart that shows how roles are related to each other's. With road hierarchy, users can access the data of the users directly below them and the hierarchy. We also mentioned that each user should have a role, but it's not required, and a user without a role will not gain access or give access through the road hierarchy. There is also the option to disable record access via road hierarchy, which grants access via hierarchies and sharing settings. Turning off this option is only available for custom objects and is not available for standard objects. The access table that the road hierarchy gives is the same as the access table given by the user giving access to the record. And finally we talked about the access grant, which is the implicit grant. We talked about the system groups and how each role creates system groups in the background that are used with implicit sharing and the group maintenance table. This is how State Force implements record access via a road hierarchy. So now whenever you change the road hierarchy or add a user to any road, you know exactly what happens under the hood on the instance that hosts your.org. finally, as usual. Thanks.
Go to testing centre with ease on our mind when you use Salesforce Certified Sharing and Visibility Designer vce exam dumps, practice test questions and answers. Salesforce Certified Sharing and Visibility Designer Certified Sharing and Visibility Designer certification practice test questions and answers, study guide, exam dumps and video training course in vce format to help you study with ease. Prepare with confidence and study using Salesforce Certified Sharing and Visibility Designer exam dumps & practice test questions and answers vce from ExamCollection.
Purchase Individually

Salesforce Certified Sharing and Visibility Designer Video Course

Top Salesforce Certifications


Top Salesforce Certification Exams
Site Search:

SPECIAL OFFER: GET 10% OFF

Pass your Exam with ExamCollection's PREMIUM files!
SPECIAL OFFER: GET 10% OFF
Use Discount Code:
MIN10OFF
A confirmation link was sent to your e-mail.
Please check your mailbox for a message from support@examcollection.com and follow the directions.

Download Free Demo of VCE Exam Simulator
Experience Avanset VCE Exam Simulator for yourself.
Simply submit your e-mail address below to get started with our interactive software demo of your free trial.
Add Comment
Feel Free to Post Your Comments About EamCollection VCE Files which Include Salesforce Certified Sharing and Visibility Designer Exam Dumps, Practice Test Questions & Answers.